
Public API
The Inscora Public API is a machine-to-machine B2B API you can use to integrate Inscora into your own systems - your CRM, your PSA, your onboarding workflow, or any other tool that already knows when a new client lands. It's the same data and the same workflows the Inscora app uses, exposed over HTTPS with token-based authentication.
💡 When to reach for the API instead of the app. Most Service Providers can do everything they need through the app and the PSA integrations. The Public API is for cases the integrations don't cover: pushing a client into Inscora the moment your PSA records them, pulling the latest CIPScore into your own dashboards, filling a questionnaire from a system that already holds the answers, or wiring Inscora into a custom partner portal.
API Documentation
Inscora's API documentation lives in two places:
- This guide article - the API docs for getting started: API key management, authentication, what each endpoint is for, rate limits, and how it fits a Service Provider workflow.
- The Swagger UI at partners.inscora.com/docs - the interactive API reference for developers. Every endpoint, request and response schema, field types, and a try-it-out console. This is the source of truth for exact payloads. It is password-protected: sign in with your username (email) and your API Key (see API Key Management below).
Read this article first to understand the workflow, then keep the Swagger UI open while you build.
Getting Started in Three Steps
- Create an API key in Settings → API Keys on the MSP portal. See API Key Management below for the full flow. You'll get back a username (email) and a one-time API Key; save the API Key immediately - it's not shown again.
- Exchange your username (email) + API Key for a short-lived bearer token by calling
POST /v1/token. Tokens last one hour; re-issue as needed.
- Use the bearer token in the
Authorization: Bearer <token>header on every other endpoint.
API Key Management
API keys are managed from the MSP portal at Settings → API Keys. The same tab is available to Brokers from the Broker portal. Only organization Admins can create, rotate, or delete keys.

The API Keys tab in MSP Organization Settings.
Creating a Key
- Open Organization Settings and switch to the API Keys tab.
- Click Create API key. Provide a Name (so future you knows which integration owns the key) and the Email address that will own it - this becomes your username (email) when you authenticate.
- Inscora generates a one-time API Key and reveals it in a dialog with an explicit "Save this secret now" warning. Copy it immediately - it is hashed at rest and cannot be retrieved later.
- Verify the username (email). Until the address is confirmed the key shows a PENDING VALIDATION status in the table and the token endpoint returns a 403.
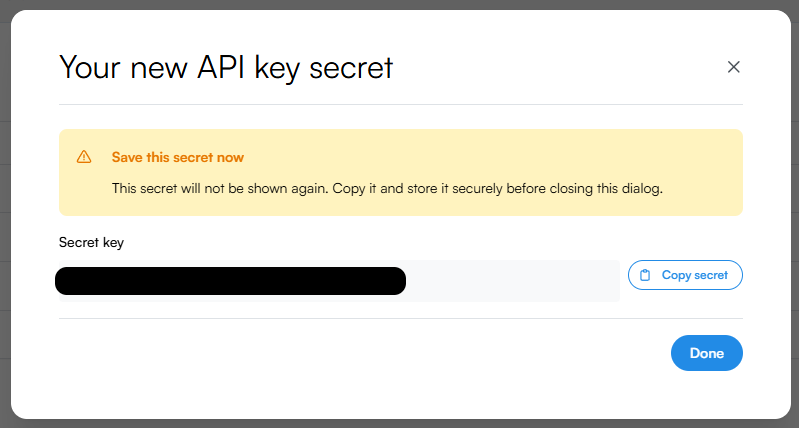
The API Key is revealed once after creation. Copy it before clicking Done; Inscora cannot show it again.
ℹ️ You can hold up to five keys. An organization can have at most five API keys at a time. Once you reach five, the Create API key button is unavailable until you delete one. Five is enough to give each integration its own key, which is what you want: separate keys mean you can rotate or revoke one integration without breaking the others.
Rotating & Deleting
Each row in the API Keys table has Rotate and Delete actions. Rotate issues a new API Key for the same entry and shows it in the same one-time dialog; the old API Key stops working immediately. Delete removes the key entirely - any token that was issued from it stops being accepted on its next use. Tokens already in flight remain valid until they expire (max one hour after issuance), so a true emergency rotation should pair the action with shortening the token lifetime upstream.
⚠️ Treat your API Key like a password. Your API Key grants full programmatic access to your organization's clients. Store it in your secrets manager, never in source control, and rotate it on the same cadence as any other production credential.
Authentication
The API uses the OAuth 2.0 Client Credentials grant (RFC 6749 §4.4). The flow has two stages:
Stage 1 - Get a token
Send your API credentials to the token endpoint:
POST https://partners.inscora.com/v1/token
Content-Type: application/json

{
  "email": "api-user@example.com",
  "secret": "<your API Key>"
}
In the request body, the email field is your username (email) and the secret field is your API Key.
On success you receive:
{
  "access_token": "<JWT>",
  "token_type": "bearer",
  "expires_in": 3600
}
The JWT is valid for one hour. The org_id claim inside the token scopes every subsequent request to the issuing organization - you cannot read another organization's clients with your token, even by ID.
Stage 2 - Call a protected endpoint
Attach the JWT to every other call:
GET https://partners.inscora.com/v1/clients/<client_id>/posture
Authorization: Bearer <JWT>
Error responses
Status | Body | Meaning |
|---|---|---|
|
| Unknown username (email), revoked key, or wrong API Key. Same response for all three to avoid leaking which part failed. |
|
| The key exists but the owner's username (email) has not been verified yet. |
|
| JWT is malformed, expired, or signed with the wrong key. |
|
| Authenticated, but the resource belongs to another organization. |
| Standard rate-limit body | Rate limit exceeded - back off and retry with exponential delay. |
Endpoint Reference
For the canonical request and response shape, see the Inscora Public API Swagger. The table below covers what each endpoint is for, who can call it, and how it fits into a Service Provider workflow.
ℹ️ Signing in to the Swagger docs. The Swagger UI is password-protected. When your browser prompts for a username and password, sign in with your API Key credentials: enter your username (email) as the username and your generated API Key as the password. These are the same credentials you set up in API Key Management.
Every endpoint is scoped to your own organization. The org_id claim in your token decides what you can see, so a client that belongs to another organization returns 403 even if you know its ID. Service Providers and Brokers can both call these; the only endpoint with different rules is POST /token, which needs no bearer token of its own.
ℹ️ Reading the tables. Paths are relative tohttps://partners.inscora.com/v1.{clientId}is a client organization's ID and{id}is a questionnaire's ID, both as returned by the calls that create them.
Authentication
Endpoint | What it does | Notes |
|---|---|---|
| Exchange your credentials (username (email) + API Key) for a one-hour JWT bearer token. | The only call with no |
Clients
The client endpoints cover the whole life of a client record: create it, keep its details current, read its insurability posture, and pull the Cyber Insurability Report.
Endpoint | What it does | Notes |
|---|---|---|
| List every client owned by your organization. | Use this to reconcile your own system against Inscora before deciding what to create. |
| Create a new client organization in your portfolio and immediately kick off discovery and the first insurability scan. | The client is attached to the calling organization automatically. Scanning runs in the background: poll the posture endpoint for results. |
| Fetch a single client record. | Same shape as the entries in |
| Update a client's name, website, communication language, or mailing address. | Partial update: send only what changes. Language accepts |
| Retrieve the client's latest insurability posture: overall CIPScore, per-category scores, and severity breakdowns. | Returns |
| Start generating the client's Cyber Insurability Report. | Runs in the background and answers with a |
| Retrieve the generated Cyber Insurability Report content. | Three possible answers: |
| List the client's completed questionnaires, newest first. | Completed only. One still being filled in doesn't appear until you mark it complete. |
| Create a questionnaire for the client and return its ID. | The starting point for the questionnaire endpoints below. Keep the returned ID: every section call needs it. |
Questionnaires
These endpoints are the API side of the cyber insurability assessment. They exist so you can fill a questionnaire from a system that already holds the answers, instead of retyping them into the answering view. A questionnaire is built from sections, and you read and save one section at a time.
Endpoint | What it does | Notes |
|---|---|---|
| List the questionnaire forms your own organization owns. | Your organization's own forms only. Shared carrier forms and other organizations' forms are never returned. |
| Get a questionnaire you created, with a summary of each of its sections. | Start here to discover the section IDs the two calls below need. |
| Mark the questionnaire as completed. | The equivalent of completing the application in the app. Do this last: afterwards it appears under |
Reading and saving a section
Sections are read and written at one path, with the verb deciding which:
GET   /questionnaires/{id}/sections/{sectionId}
PATCH /questionnaires/{id}/sections/{sectionId}
GET returns the section's current answers plus the schema describing its fields, which is what tells you how to map your own data onto it. PATCH saves answers in, merging over what's already stored so you can fill a section in several passes. Saving also refreshes the client's CIPScore, exactly as answering in the app does.
Putting It Together
A typical onboarding integration chains the endpoints like this:
POST /tokenonce, then reuse the token for the hour.
POST /clientswhen your PSA or CRM records a new client. The first scan starts on its own.
- Poll
GET /clients/{clientId}/postureuntil a posture comes back, then push the CIPScore into your own dashboard.
POST /clients/{clientId}/questionnairesto open a questionnaire,GET /questionnaires/{id}to list its sections, thenPATCHeach section with the answers you already hold.
POST /questionnaires/{id}/completewhen every section is filled.
POSTthenGET /clients/{clientId}/recommendationto generate and collect the Cyber Insurability Report for the client.
ℹ️ The Swagger doc is the source of truth for schemas. Request and response bodies, field types, and optionality are all documented in the Swagger UI. The tables above are for orientation; for a question like "what fields does the create-client call accept," always consult Swagger.
Rate Limits
The Public API enforces per-organization rate limits on both the token endpoint and the protected endpoints. When you exceed the limit you receive an HTTP 429; back off and retry. The limits are sized so a sensible integration - issuing one token per hour and making a handful of writes/reads per client - never hits them. Bulk-syncing thousands of clients in a tight loop will, so space those requests out or add a short delay between calls and you'll stay well under the ceiling.