
Create & Finalize an Assessment
Step 4: Create & Finalize a Cyber Insurability Assessment
The cyber insurability assessment brings together your client's scan results and their answers to carrier questionnaires into a single, scored application that can be sent to a broker for quoting. This page covers starting an application, selecting questionnaires, completing and submitting it, and assigning a broker.
Note: Where does the assessment fit?
By this point you've added a client, run a scan, reviewed the CIPScore, and invited a client user. The assessment is where the client (or you, on their behalf) answers the questions that carriers and underwriters need, filling in the categories that the scan alone can't evaluate.
Starting a New Application
- From the client page, click the
Start Applicationbutton.
- The Select Questionnaire modal appears. This is where you choose which questionnaires your client will complete. The modal has three dropdown filters at the top:
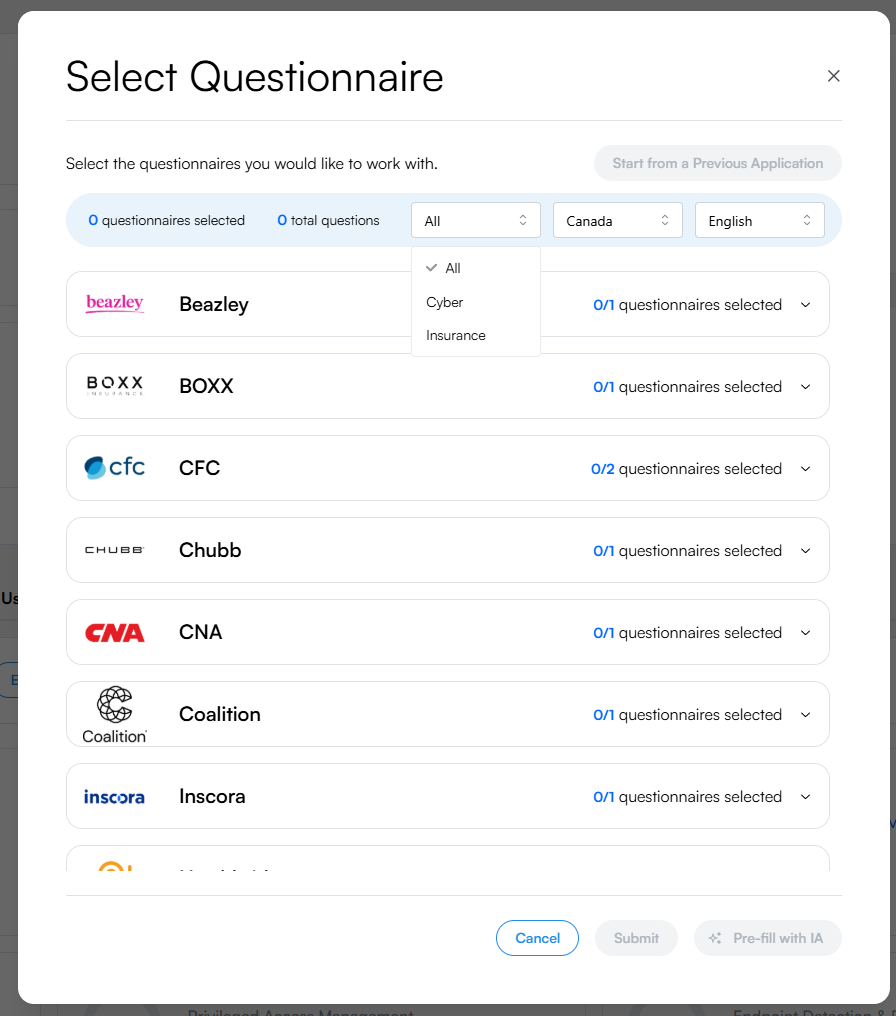
The Select Questionnaire modal with type, geolocation, and language filters.
Cyber Insurability Assessments vs. Insurance Applications
The Type filter distinguishes between two kinds of questionnaires:
Type | What it is | When to use |
|---|---|---|
Cyber Insurability | Inscora's own standardized cyber assessment. Focuses on the security controls that matter most for insurability. | Best starting point for most clients. Use this to establish a baseline CIPScore before involving a broker or carrier. |
Insurance Applications | Actual application forms from insurance carriers (Beazley, BOXX, CFC, Chubb, CNA, Coalition, etc.). | Use when the client is ready to apply with a specific carrier, or when you want to pre-fill carrier-specific questions alongside the cyber assessment. |
Setting the filter to All shows both types mixed together. You can select questionnaires from both categories in a single application. This hybrid approach is common: select Inscora's cyber insurability assessment and a carrier's application form so the client answers everything in one pass.
Selecting Carriers and Questionnaires
Below the filters, the modal lists available carriers. Each carrier may offer multiple questionnaires. Click a carrier to expand its list and select the ones you want.

Each carrier can have multiple questionnaires. The "+49 questions" label shows how many new questions each additional selection adds.
Tip: Question deduplication
When you select multiple questionnaires, Inscora automatically deduplicates overlapping questions. If two carriers ask the same thing (e.g., "Do you enforce MFA for remote access?"), your client only answers it once. The modal shows "+X questions" next to additional selections to indicate how many new questions that questionnaire adds beyond what's already covered.
A counter at the top of the modal shows the total number of questions across all selected questionnaires (after deduplication).
Note: Custom questionnaires
If your organization has created custom cyber assessment forms, they also appear in this list. Custom questionnaires let you bring your own evaluation criteria into the platform alongside carrier forms.
Submit vs. Pre-fill with IA
Once you've selected your questionnaires, you have two options at the bottom of the modal:
Option | What it does |
|---|---|
Submit | Creates a blank application. All questions start unanswered. |
Pre-fill with IA | Creates the application and pre-populates answers using data from the client's most recent scan. Questions about email security (DMARC, SPF, DKIM), end-of-life software, open ports, and similar topics that the scan already evaluated will be filled in for you. |
Pre-filling saves time, especially for questions where the scan data directly maps to what the carrier is asking. You can always review and adjust pre-filled answers before completing the application.
The Questionnaire View
After submitting, you're taken to the questionnaire view where you (or your client) answer the questions. This interface has its own set of features and navigation tools. See The Questionnaire View for a full walkthrough of answering questions, navigating sections, severity badges, and per-question tools like Explain and Comments.
How Answers Feed the CIPScore
The CIPScore draws from two main data sources (with a third on the way):
- Automated perimeter scan - evaluates internet-facing assets.
- Questionnaire answers - evaluates internal controls that the scan can't see (MFA policies, incident response plans, backup procedures, etc.).
- Internal connectors (coming soon) - will pull data directly from security tools like endpoint protection platforms and identity providers.
As your client answers questions, each response is evaluated and assigned a severity badge (Critical, High, Medium, Low, Valid, or Info). These scores feed into the relevant CIPScore category in real time. Categories that previously showed "N/A" (because they need input from the client or from you as a Service Provider) will start populating as answers come in.
You can see this on the CIPScore detail page: each category now has two tabs, Cyber Insurability Scan and Application Answers. The severity counts at the top of each category are the combined totals from both sources.
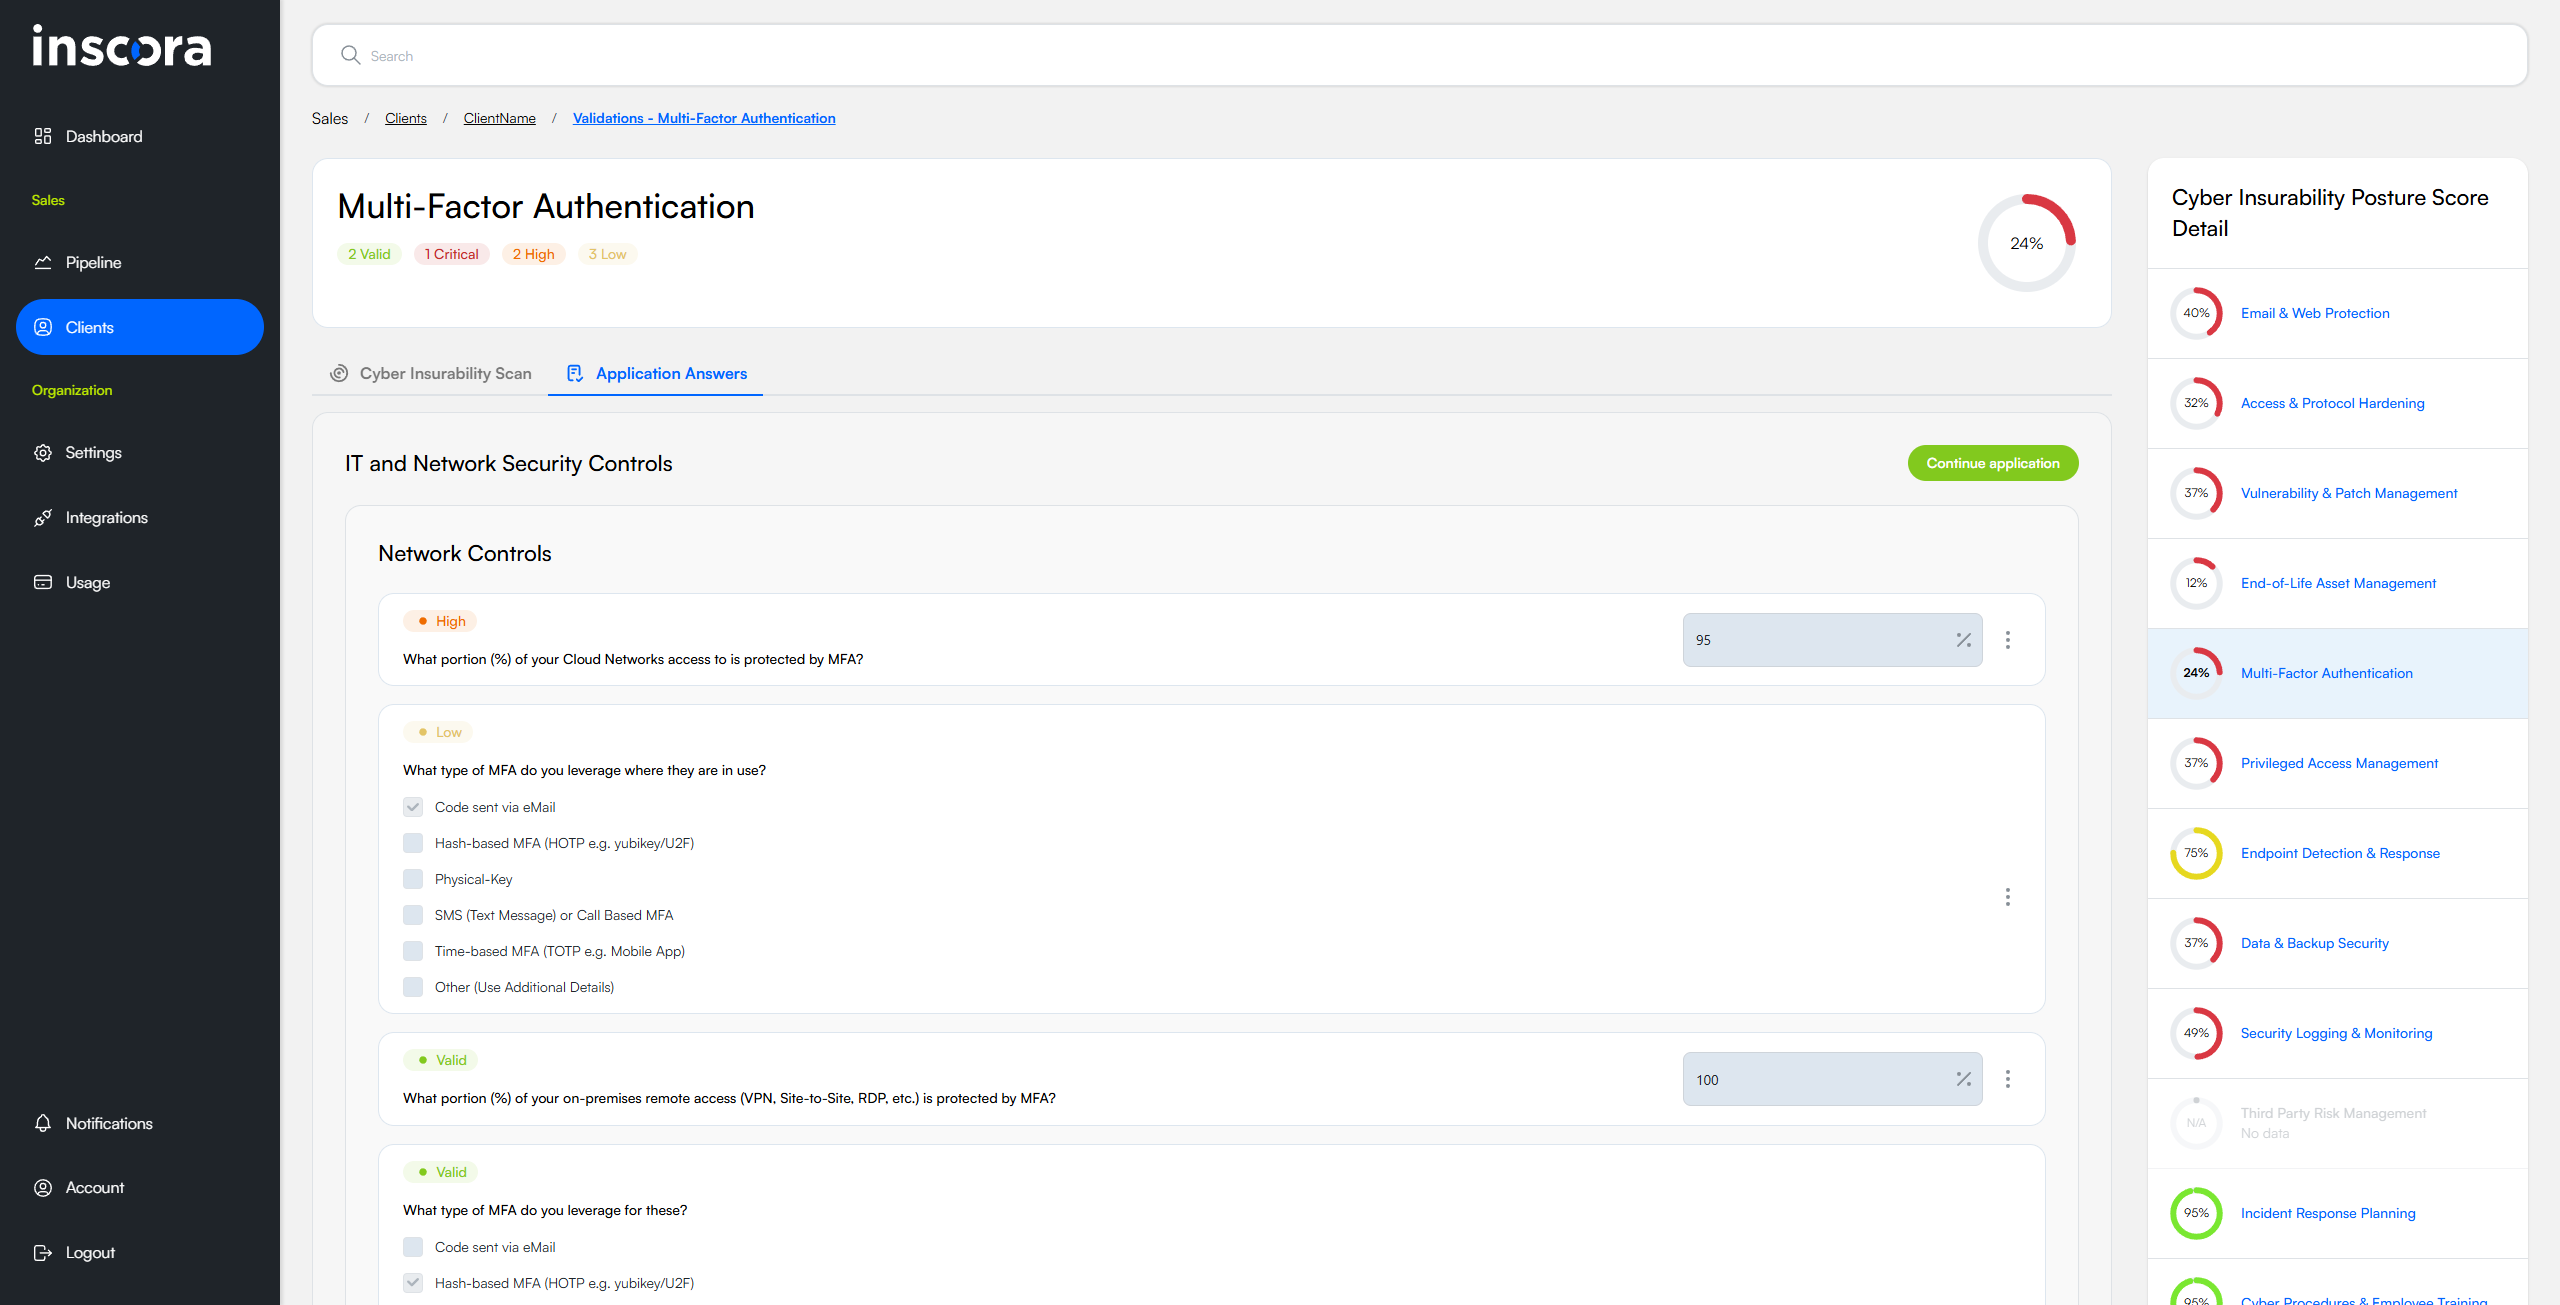
Each CIPScore category shows scan results and application answers in separate tabs. Severity counts at the top combine both.
Note: Read-only in the CIPScore view
The Application Answers tab in the CIPScore detail view is read-only. It shows you what the client answered and how it was scored, but you can't edit answers from here. To make changes, click the Continue Application button to return to the questionnaire.
Completing the Application
When all sections are complete, click the Complete Application button. This does two things:
- A PDF report is generated with all the client's answers, formatted for broker and carrier review.
- The Assign Broker modal appears, prompting you to designate a broker who will receive the application.
Assigning a Broker
Service Providers don't sell insurance directly. They work with brokers who access the insurance markets on the client's behalf. The Assign Broker modal gives you three options:
Option | What happens |
|---|---|
Assign Inscora's Partner Broker | Assigns one of Inscora's partner brokers who specialize in cyber insurance. A country selector lets you pick the right market. This is the recommended option (see below). |
Invite the Client's Broker | If the client already has a broker, you can invite them to the platform with limited access to this client's data. |
I will select later | Skips broker assignment for now. The application is saved as complete and you can assign a broker at any time from the client page. |
Tip: Why use Inscora's Partner Broker?
Inscora partners with brokers who specialize exclusively in cyber insurance. These are not generalist brokers who happen to offer a cyber line - they work in cyber insurance full-time, across every major carrier and market. This matters for three reasons:
Advantage | What it means for your client |
|---|---|
Broadest product access | Inscora's partner brokers have relationships with the widest range of cyber insurance carriers. More options means better pricing and coverage terms tailored to your client's specific risk profile. |
CIPScore fluency | They understand the technical details behind each CIPScore category and know how to present scan results to underwriters in a way that gets the best terms. Nothing gets lost in translation between the assessment data and the insurance submission. |
Cyber-specific expertise | A generalist broker may not fully understand the difference between a DMARC validation and an open RDP port. Inscora's partners do, and they can advise your client on which gaps to close for better coverage and lower premiums. |
Even if your client already works with an insurance broker, consider using Inscora's Partner Broker for the cyber line. A broker who lives and breathes cyber insurance will almost always find better-fit coverage than a generalist handling cyber as one of many lines. Your client's existing broker can continue managing their other policies.
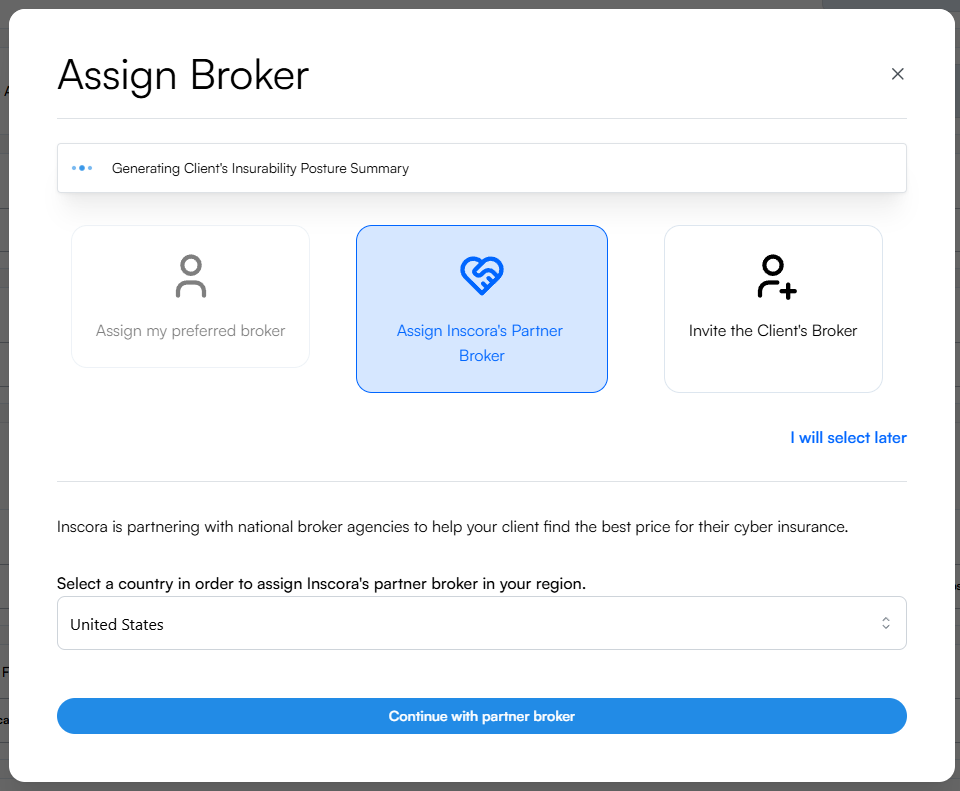
Choose how to assign a broker after completing the application.
Once a broker is assigned, they receive a notification and the client appears in their broker portal with full visibility into the assessment answers. You can unassign a broker at any time by clicking the x icon next to their name on the client page.
Past Applications
Completed applications appear in the Past Applications tab on the client page. Each entry shows the carrier, last update date, status, and three actions:
Action | What it does |
|---|---|
View | Opens the completed application in read-only mode so you can review all answers and scores. |
Export | Downloads the application as a PDF report. |
Re-open | Re-opens the application for editing. Picks up exactly where you left off with all answers preserved. |

Past applications are always accessible for review, export, or re-opening.
Starting from a Previous Application
When a client already has a completed application on file, the Start Application button offers an additional option: Start from Previous Application. This creates a new application pre-populated with the answers from the previous one.
This is especially useful for renewals. Instead of answering everything from scratch each year, the client starts from their last application and only updates what has changed. Because Inscora retains all answers in the platform, nothing gets lost (unlike traditional PDF forms that can disappear in email chains).
Tip: Renewals made easy
Encourage clients to use "Start from Previous Application" at renewal time. They get a head start with all their prior answers intact and only need to update the controls that have changed since the last assessment.
Edit Carriers
Changed your mind about which questionnaires to include? While working on an application, click the Edit Carriers button to re-open the Select Questionnaire modal. You can add or remove carrier questionnaires at any time without losing the answers you've already provided.