
Invite a Client User
Step 3: Invite a Client User
At this point you've added a client, run a scan, and reviewed the CIPScore results. Some categories (Multi-Factor Authentication, Incident Response Planning, Endpoint Detection & Response, etc.) show "N/A" because they need input from the client or from you as a Service Provider through the assessment questionnaire. Inviting someone from the client's organization gives them access to the platform so they can also provide this information directly.
How to Invite a Client User
- From the client page, click the
Share to Clientbutton in the upper-right corner of the screen.
- A modal will appear. Enter the email address of the person you want to invite and select the appropriate role from the dropdown.
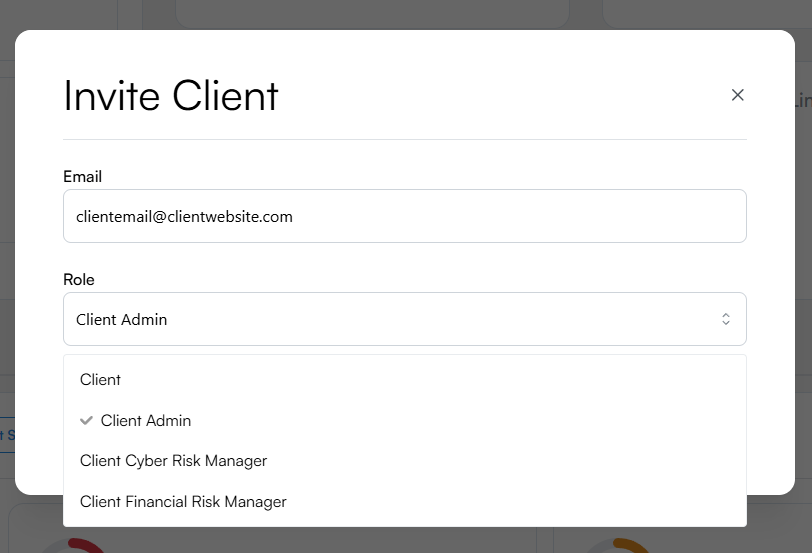
Enter the client user's email and choose their role.
- Click Send Invitation. The invited user will receive an email with a link to access their client portal at client.inscora.com.
Client Roles
When inviting a user, you'll choose one of two roles that determine what they can do within the platform:
Role | What they can do |
|---|---|
Client | Can view everything about their organization: CIPScore results, scan validations, assessment progress, reports. This is the default role for most client users. |
Client Admin | Same as Client, plus the ability to invite and manage other users from their organization. Good for the primary contact, typically a decision-maker or IT lead who may need to bring in colleagues. |
Tip: Who to invite
Think about who at the client can answer questions about internal security controls: MFA policies, backup procedures, endpoint protection, incident response plans. Often it's an IT manager or security-aware operations lead. If you're not sure, start with Client Admin so they can bring in the right people.
User Status
Each client user in the Client Users tab has a status that tells you where they are in the onboarding process:
Status | Meaning |
|---|---|
Invited | The invitation email has been sent but the user has not yet accepted it or created their account. |
Active | The user has accepted the invitation, finalized their profile, and successfully accessed Inscora. |
Managing Client Users
Each user row has a three-dot menu (on the right side) with the following options:
Action | Description |
|---|---|
Resend Invitation | Available for both statuses. For Invited users, this re-sends the original invitation email. For Active users, this triggers a password reset email - useful if a client user needs to regain access to their account. |
Change Role | Switch a user between Client and Client Admin at any time. |
Remove | Revoke the user's access to the platform entirely. |
What Happens Next
Once the user accepts and logs into client.inscora.com, they can see their organization's data and start contributing to the assessment. The categories that currently show "N/A" (MFA, Privileged Access Management, EDR, Security Logging, Third Party Risk, Incident Response, Cyber Procedures) will fill in as the client - or you as a Service Provider - provides answers.
This is also a good time to use the Export Summary to share a snapshot of the current scan results with the client, giving them context before they start the assessment.